Wednesday, 22 July 2015

How to: my pin-point concealing and layering of concealer.

Pin point and layering concealer

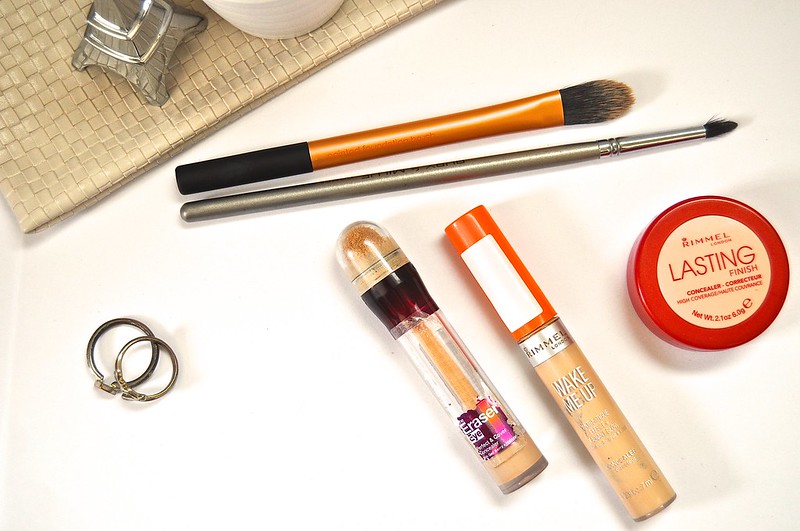
I first came across pin-point concealing via the wonder of Lisa Eldridge and her Youtube channel, since then, one of my most loved makeup videos from her has been her look of creating 'Natural, flawless skin' and can be seen here (totally recommend this!). It's an idea that instead of slathering on lots of concealer over a blemish or redness on the skin, instead you conceal small areas using a technique with a pointed brush - pin point concealing has basically changed the way I apply makeup and how I cover up any spots on my face. I generally tend to use three different concealers for covering dark circles, evening skin tone, and covering blemishes as not only are there different tones to skin, but depending on where the blemish is, can depend on what type of concealer I choose (stick, cream, liquid etc). My three concealers are in three different shades, starting from the lightest (shade) and it's Rimmel's Lasting Finish Concealer (£5.49, here), Rimmel's Wake Me Up Concealer (£5.49, here) and Maybelline's Eraser Eye Concealer (£7.99, here). All three are very different, and I always blend them in different ways, into the skin. 

Pin Point Concealing is what I do after my foundation has been applied and buffed in; then I look at all the extra areas that need a little bit more help, such as my under eyes, redness around my nose and cheeks, as well as any little blemishes I might have. Lisa says to use the thinnest brush possible for pin point concealing, and whilst I do agree with her, I've found that I had to find the right brushes for me, and those are brushes from Ruby & Millie (Pointed Concealer Brush) as well as from Real Techniques (pointed foundation brush). I also tend to blend a little with my fingers, as well as a fluffy eyeshadow brush if I feel like the edges of certain concealer covered blemishes need to be buffed in. For small blemishes like ones on my forehead, I dab the smallest amount of Wake Me Up concealer on my hand, before dipping my Ruby & Millie brush in, and then applying it to the area, before softly blending with my fingertip. Now, my nose tends to get very red, and requires a good amount of concealer to combat the colour - instead of using a brush to apply, I simply apply from the wand of Wake Me Up concealer and then buff into the skin, with a combination of RT's Pointed Foundation Brush and my fingers, as I want everything to be blended seamlessly, and I can never seem to find a clean fluffy eyeshadow brush when I need to do this - so I make do with what I've got. 

If I've got a major spot, one so big that requires its own post code and stylish wardrobe, then I know that my pin point concealing has to be on form (or on fleek, if you will). I seem to be getting a few around my mouth and chin, looking like a spider bite piercing without pain of piercing anything on my actual face. These kind of blemishes take some extra care. This is when I tend to mix a dab of Wake Me Up and Lasting Finish together, in order to get a flawless finish using a fine pointed brush, I tend to dab a bit on and then blend ever so softly with my little finger (I know, I know, we're using basically every finger in these two concealing tricks - see below for more finger blending) as it's small enough to gently buff the edges away, but if I do find a free and unused fluffy eye shadow brush, then that's exactly what I'd use to blend the edges. 

Layering Concealer under my eyes is something I've learnt to do since realising that no matter what, my dark circles just aren't going to budge, no matter what eye creams or skincare companies say; they're hereditary and here for good. So, in the effort to not look permanently exhausted, I've taken to layering concealers and this has totally changed my way of applying under eye makeup. Because the skin is so thin under the eyes, I don't want to heave on lots of makeup, as it'll only crease - which isn't a good look for me. I try and apply thin layers, blending fully before seeing if I need another layer. My first layer of concealer is Rimmel's Wake me up Concealer and is perfect for brightening the under eye area, as well as the inside corner of the eye, which for me, can always benefit from some illumination. As this is a liquid, it can be layered itself to increase coverage, but I like to apply a single layer with my Real Techniques Pointed Foundation Brush as it gets right into the corners of the eye. After that, I apply a few little dabs of Maybelline's Eraser Eye Concealer to try and disguise the deep purple of my dark circles, as it has a certain peachy tone to it, that I find covers them very well. I tend to blend this out with my fingers, mainly my ring finger as it has the lightest touch and won't stretch the skin. Then, I use Rimmel's Lasting finish Concealer and press that onto the skin very lightly with my middle finger, before once again blending out with my ring finger. It's possible to layer concealer without using any brushes at all, so if you're on the move, and don't have any brushes but have dark circles galore, then no need to fret, clean fingers are as good as any brush. 

I've listed three products that I use everyday but that doesn't mean that a palette isn't going to be an easier option for you. Makeup Revolution's Ultra Cover and Conceal Palette (here), Sleek's Makeup Corrector and Concealer Palette (here) and Mac's Pro Conceal and Correct Palette (here) are all different prices but are all products that I have seen recommended for their concealing benefits, so if you'd rather carry around one palette than a handful of products, I would definitely recommend looking into one of these. Do you pin point and layer concealer? 


SHARE:

Tuesday, 15 April 2014

The Soap & Glory Face


I'm a big Soap & Glory fan (can you tell from the amount of products that I have?) as not only are their body products my go-to for showers and baths... general bathing has got S&G written all over it, but today, so has my face. Aside from a few key products that I have yet to cover (brow product, mascara, primer and concealer) everything else is totally retro-ed up (gotta love that packaging). It's safe to assume that all of the face products are in the palest possible shades, whilst the powders are translucent and the lip products (wow) are a delicious berry colour that I cannot get enough of. 


For the base, I primed my skin using Revlon's Photofinish Primer and allowed that to skink into the skin for about 30 seconds, before applying Show Good Face in 'Fairest of them all' (£11 here). Now, as far as foundation names go, it's pretty much the bee's knees. Now after applying this with my Real Techniques buffing brush, I used my concealer of choice, and lately, that has been Seventeen's Phwoarr Paint (I love it so much, it's ridiculous). So, after everything that needs hiding has been concealed, I went onto the brows (in which I used my MUA Brow Palette), then the eyes.

I'm a huuuuge fan of Black Liquid Eyeliner, so Supercat Eyeliner Pen Carbon Black Extreme (£6 here) was right up my street, and it's sooo black. I usually start, eyeliner wise, in the middle of the eye, and draw a thin line, close to the lashes; this helps me determine what kind of look I want for the day. It usually depends on how dramatic I want the liner to look, and this makeup was about a very thick cat-eye with a subtle flick at the end; I like mixing it up with a thick line and a small flick, or a thin line and a dramatic flick. It's all about the mood for the day. The pen is so easy to use and can be built up for a subtle or dramatic look - whichever i'm favouring at that moment. It lasts pretty much all day, in my experience, and if it can survive an 8 - 8 shift, then this is something to definitely consider looking at. I didn't add anything eye to the eye except my old faithful mascara, L'oreal's Telescopic in waterproof black after curling my lashes with my Shu Umuera curlers and Avon's Supershock Eyeliner on the inside of the eye, to make things a bit brighter. 


Back to the skin; to get that glow I used Glow all Out Luminizing face Powder (£11 here) as a highlighter on the cheekbones and blended into the hairline, and just where I thought a bit of colour would be appreciated. Mainly because I'm so pale, I tend to use it in certain places, and not as an all over powder, but it can be used for that; with it's Luminospheres pigment pearls, it's a sublet but very effective powder that provides a very dewy glow, perfect for pale skin, as well as darker skin tones. 

As I was going for quite a natural, glowy look, I only used an additional touch of contour through the hollows of my cheeks (Sleek's Face Contour Kit), and then moved onto the powders. I do love a good powder, and the offerings from Soap & Glory are definitely some of my favourites. First applied is Kick Ass Instant Retouch Powder (£12 here), all over the face with a fluffy face brush, and this gives the most flawless finish, setting the foundation and concealing any shine or blemishes missed. This powder is translucent, and just gives a gorgeous 'finished look' to the face, making everything look fabulous, but still not concealing the glow we worked so hard (well, not really, it was easy) to achieve. The last of the powder products, is One Heck of a Blot and this is dusted very lightly over the T-zone, to eliminate shine; shine and glow are completely different things, but my mum thinks I look good either way, so win-win?


Finally, on to the lips! First layer of colour goodness goes to Super Colour Fabulipstick Powdercoat (which is a rather long name, if you ask me) in the shade Pom Pom (£9 here). It's hailed as a 'traffic-stopping pomegranate pink' which I quite agree with (except for the traffic-stopping... that happen to anyone?) as it's a gorgeous colour, with a matte finish and collagen boosting formula to tone and plump the lips. Now, my lips are quite full, so plumping isn't necessarily an issue, but I really did enjoy the way this felt on the lips, as not only did it glide across the surface, but held it's colour for a good amount of time before touching up was needed (three hours or so). However, in the pictures taken, I've slicked a bit of gloss on top, Sexy Mother Pucker Gloss Stick (£8 here) to be exact. It's in the shade Plum Jam and looks glorious on top of Pom Pom (a perfect match, if I do say so myself) - I'm not a gloss person. At all. They always feel too sticky and your hair gets caught in them... it's a bit no-no from me. But! (you knew there was a but coming, right?) this is different! It doesn't really feel sticky at all, and it glides across the lips, giving a kick of colour to bare/or lips that already have product on. The stick allows for easy application for touchups on the go, and like all of their products, have darling packaging.

I'm a sucker for all things retro, and they don't come better than Soap & Glory. So, this was a little product focus, despite interjecting a few non S&G items and this is the first proper appearance of my face in a blog post. I know. Ah well, go big, or go home, right? (Kinda silly really, because the picture of my face is huge.. and i'm home already...) any who! Let me know which Soap & Glory products you use on your face, and why I need to have them (gotta expand on my collection *winkwink*).


SHARE:

Thursday, 20 March 2014

Garnier Micellar Cleansing Water


So, I've been using this little beauty for about two weeks now, after finally tracking it down in Asda, and after seeing loads of bloggers swoon over this little product. I take that back. It's not little at all -  it's actually 400ml of goodness and a brilliant size for all of your cleansing needs, whether it's removing makeup as a pre-cleanse or touching up your eye makeup or lips with a cotton bud; this is the product to go to. I like this product. I really do. It's for sensitive skin and doesn't irritate my eyes at all, which is brilliant, as who wants red, bloodshot eyes when you're just trying to go about your day to day life? Certainly not me. 

The cleansing water doesn't really have any discernible smell or look; so much so, it looks like a bottle of water. My mum actually thought that it was one of those fancy, artisan bottles of water. Ahhh, if only. I'd love a bottle of water to look like that. Anyway, the packaging is very sturdy, and you get a lot of product, far more than in the L'oreal offering, which is always a good thing by me. I do really like the L'oreal cleansing water as well, but this has so much more product for the money (unless they're both on offer, then it's more of a personal preference). For me, I have to give the edge to Garnier, as not only does it remove makeup very quickly and without fuss, it takes off all that eyeliner and mascara (although to remove waterproof mascara, you do need to hold in over the eye for a good 20 seconds). It just removes product seamlessly, and is a wonderful addition to the market of Micellar Cleansing Waters. 

It claims to soothe skin whilst it removes makeup, and I do partially agree with that, as although it's not overtly smoothing, it doesn't irritate my skin, which is oily/combination but still sensitive in places (ahhh the joys of facial skincare). I apply this to a cotton pad and run it all over the face, taking extra care around the eyes and the makeup on there. It usually takes me two or cotton pads to remove everything before I go onto the next step of my nightly skincare routine. I follow this with my pre-cleansing oil, then my hot cloth cleanser and then all those fun skincare bits (toner, serums, oil, moisturiser... that never ending list) and it's really working for me. Because it says that it's suitable for even sensitive skin, and I have been using it for the past two weeks or so, I would definitely recommend those looking for a good Micellar water, to give this a go. Especially as it's on offer in Tesco right now.

Is this something that you'd try? Are you a micellar water fan? xx
SHARE:
© bexhowells. All rights reserved.
Blogger templates by pipdig