
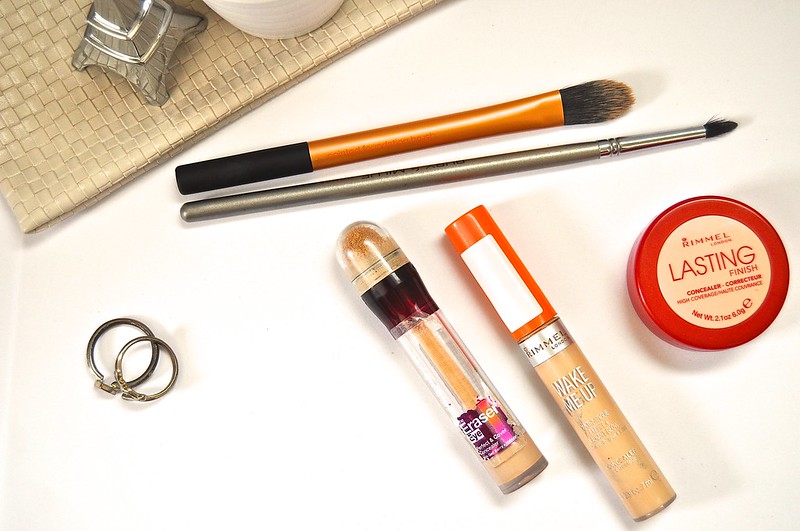
I first came across pin-point concealing via the wonder of Lisa Eldridge and her Youtube channel, since then, one of my most loved makeup videos from her has been her look of creating 'Natural, flawless skin' and can be seen here (totally recommend this!). It's an idea that instead of slathering on lots of concealer over a blemish or redness on the skin, instead you conceal small areas using a technique with a pointed brush - pin point concealing has basically changed the way I apply makeup and how I cover up any spots on my face. I generally tend to use three different concealers for covering dark circles, evening skin tone, and covering blemishes as not only are there different tones to skin, but depending on where the blemish is, can depend on what type of concealer I choose (stick, cream, liquid etc). My three concealers are in three different shades, starting from the lightest (shade) and it's Rimmel's Lasting Finish Concealer (£5.49, here), Rimmel's Wake Me Up Concealer (£5.49, here) and Maybelline's Eraser Eye Concealer (£7.99, here). All three are very different, and I always blend them in different ways, into the skin.
Pin Point Concealing is what I do after my foundation has been applied and buffed in; then I look at all the extra areas that need a little bit more help, such as my under eyes, redness around my nose and cheeks, as well as any little blemishes I might have. Lisa says to use the thinnest brush possible for pin point concealing, and whilst I do agree with her, I've found that I had to find the right brushes for me, and those are brushes from Ruby & Millie (Pointed Concealer Brush) as well as from Real Techniques (pointed foundation brush). I also tend to blend a little with my fingers, as well as a fluffy eyeshadow brush if I feel like the edges of certain concealer covered blemishes need to be buffed in. For small blemishes like ones on my forehead, I dab the smallest amount of Wake Me Up concealer on my hand, before dipping my Ruby & Millie brush in, and then applying it to the area, before softly blending with my fingertip. Now, my nose tends to get very red, and requires a good amount of concealer to combat the colour - instead of using a brush to apply, I simply apply from the wand of Wake Me Up concealer and then buff into the skin, with a combination of RT's Pointed Foundation Brush and my fingers, as I want everything to be blended seamlessly, and I can never seem to find a clean fluffy eyeshadow brush when I need to do this - so I make do with what I've got.
If I've got a major spot, one so big that requires its own post code and stylish wardrobe, then I know that my pin point concealing has to be on form (or on fleek, if you will). I seem to be getting a few around my mouth and chin, looking like a spider bite piercing without pain of piercing anything on my actual face. These kind of blemishes take some extra care. This is when I tend to mix a dab of Wake Me Up and Lasting Finish together, in order to get a flawless finish using a fine pointed brush, I tend to dab a bit on and then blend ever so softly with my little finger (I know, I know, we're using basically every finger in these two concealing tricks - see below for more finger blending) as it's small enough to gently buff the edges away, but if I do find a free and unused fluffy eye shadow brush, then that's exactly what I'd use to blend the edges.
Layering Concealer under my eyes is something I've learnt to do since realising that no matter what, my dark circles just aren't going to budge, no matter what eye creams or skincare companies say; they're hereditary and here for good. So, in the effort to not look permanently exhausted, I've taken to layering concealers and this has totally changed my way of applying under eye makeup. Because the skin is so thin under the eyes, I don't want to heave on lots of makeup, as it'll only crease - which isn't a good look for me. I try and apply thin layers, blending fully before seeing if I need another layer. My first layer of concealer is Rimmel's Wake me up Concealer and is perfect for brightening the under eye area, as well as the inside corner of the eye, which for me, can always benefit from some illumination. As this is a liquid, it can be layered itself to increase coverage, but I like to apply a single layer with my Real Techniques Pointed Foundation Brush as it gets right into the corners of the eye. After that, I apply a few little dabs of Maybelline's Eraser Eye Concealer to try and disguise the deep purple of my dark circles, as it has a certain peachy tone to it, that I find covers them very well. I tend to blend this out with my fingers, mainly my ring finger as it has the lightest touch and won't stretch the skin. Then, I use Rimmel's Lasting finish Concealer and press that onto the skin very lightly with my middle finger, before once again blending out with my ring finger. It's possible to layer concealer without using any brushes at all, so if you're on the move, and don't have any brushes but have dark circles galore, then no need to fret, clean fingers are as good as any brush.
I've listed three products that I use everyday but that doesn't mean that a palette isn't going to be an easier option for you. Makeup Revolution's Ultra Cover and Conceal Palette (here), Sleek's Makeup Corrector and Concealer Palette (here) and Mac's Pro Conceal and Correct Palette (here) are all different prices but are all products that I have seen recommended for their concealing benefits, so if you'd rather carry around one palette than a handful of products, I would definitely recommend looking into one of these. Do you pin point and layer concealer?
I have multiple concealers and spot-conceal almost every day. I have very clear skin so foundation is a bit of a chore to apply as it takes awhile and doesn't look quite as skin like as I prefer.
ReplyDeletenueyork.blogspot.com
I like the collection of concealers you've got..
ReplyDeletewww.blushinginlife.blogspot.co.uk